Photo Sharing and Video Hosting at Photobucket
Showing posts with label Tutorials. Show all posts

Wednesday, December 19, 2007

Easy Baby Burpcloth / Burpie Tutorial

A made a few of these burp cloths for my friend’s shower. Well she had the baby and he’s a spitter-upper. She liked the burpies so much she asked where she could buy more. What a compliment, right? So I made her a few more and figured I’d share the super easy method with you all.

The store ones are so thin and pretty much useless. You could just get the plain diapers, but I think adding the flannel makes them cuter and also adds another layer of absorbency. These are pretty basic so I feel a little silly writing a tutorial, but hey we all start somewhere, right?


baby boy burp cloths
So here goes… Embellished Diaper Burp Cloth Tutorial
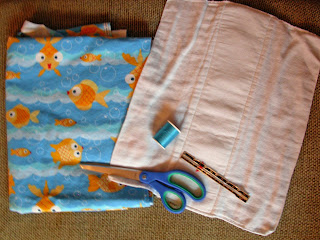
burp cloth materials

1) Gather your materials and prewash/dry fabrics and diapers in case there is any shrinkage.
· White “diaper service quality” prefold diapers (available at Target or other –Mart, ironically these suck as actual diapers. LOL)
· Cotton Flannel in a cute print (1/4 yard will make two with a couple inches to spare)
· Thread in contrasting color and white
· Ruler
· Iron
· Sewing Machine


cutting the fabric

2) Cut! Cut your flannel into strips about 7” wide and as long as your diapers + 1”. We are going for a ½” hem allowance and a 6” wide strip on our finished product. If you are making a bunch of these you can make a basic pattern out of paper and use that to cut out all your strips.


press under the edges

3) Press! Fold 3 edges under ½” to the wrong side of the fabric and iron. Leave one of the short ends as it is. I usually just turn that one under as I’m sewing since the diapers aren’t really a straight edge. I like using my hem ruler because it is 6” and I can make sure that the strip is an even width that way.


pin the fabric4) Pin! Center the fabric strip on the diaper and pin in place. Pin well so that the fabric doesn’t shift around too much while you are stitching.
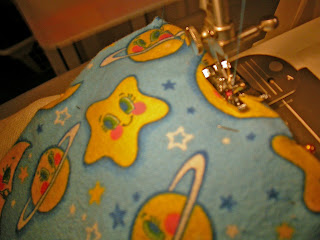

sewing the burpies
5) Sew! I like to start on the short end that I pressed under and then work my way down one of the long sides. Just sew close to the edge in a straight line. I usually line up the edge of the flannel with the edge of the pressure foot. I turn under the other short side as I go, and finish up the final long side. I also like playing around with the fancy stitches on my machine, but a plain zig-zag looks just as nice. I use a contrasting thread on the top and a white thread in my bobbin so it doesn't show so much on the backside. This also makes it easy if are using a bunch of different patterns since you don't have to mess with changing out the bobbin thread.
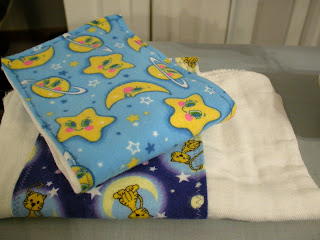


ta-da!
6) Gift! Tie up a stack of these for a nice little baby gift. These cost me under $2 each for materials so a set of three would be a nice little something to gift. JoAnns has so many fun flannel prints. You can think outside the "baby" box and pick prints that suit mom, like coffee or mod florals.

Tuesday, August 21, 2007

Kool-Aid Dying Playsilks Tutorial

First off, I never knew Kool-Aid was hyphenated. Koolade? Koolaid? Nope Kool-Aid! LOL

Why dye with Kool-Aid? Well, first off it's food grade so it's non-toxic. You can use your regular pots and utensils when using it. Also, you don't need any special chemicals. Just some unsweetened drink mix, vinegar and water. Kool-Aid is in the category of acid dyes. Acid dyes work well on protein fibers like silk and wool. You use heat to set the dye and make it permanent.

Acid dyes do NOT work well on cotton. For cotton you need fiber reactive dyes and soda ash.

Today it was rainy and Peanut was napping so I decided to try my hand at dying some playsilks. I think this would be a fun project to do with older kiddos.
I still need to do some cottons this week, but that is a much more involved process.

Another side note, if you don't know what playsilks are click over here.

Without further ado, here's a little tutorial for ya!

Materials:
Big Pot
Jars (Mason or clean tomato sauce jars work nicely)
Kool-Aid or other unsweetened drink mix (4-5 packets per scarf)
Distilled White Vinegar (for some extra acidity)
Plastic Spoon
Playsilks
(I got the 35x35" size silk scarves from http://www.dharmatrading.com/)

Step 1:

Soak scarves with warm tap water and a glug of vinegar while you mix up the dyes.


Put about 1 1/2 cups of hot tap water in each jar. Add 4-5 packets of drink mix and a splash of vinegar (about 1Tbs). Add more mix for darker colors, or less for lighter colors. Put the lids on and shake to dissolve the mix.


Step 2:

Put a few inches of water in the pot. Place the jars in the pot on the stove and bring to a slow simmer. You don't want it to get all crazy and splashy.


Step 3:

Put one silk scarf in each jar and squish it around with a plastic spoon.

Step 4:

Continue heating and squishing the scarves around in the jars until all the dye is absorbed. The water will turn almost clear or a milky color when the dye is set. This will happen quickly for some colors or take longer for others. The scarves sucked up the green really fast, but the red gave me some trouble.


Step 5:

Rinse in cold water and hang to dry. If the dye is absorbed into the silk you will only have to rinse once.


MY NOTES:
This is not an exact science. Some colors seem to take better than others. The red/Fruit Punch took me forever to absorb. I think I could have used much less dye than I did. I actually winded up changing the water and reheating it again after rinsing it out once. I searched around a bit on the web and found that most people have some issues with the red not taking all the way.
When I dyed wool yarn, purple/grape seemed to separate and dye very unevenly but I've seen some pretty purple playsilks on the web. There seems to be alot of hit or miss on the flavors, but that's part of the fun!

Also, if you have more liquid, your color will be more even. The less liquid, the more marbled effect you will get. For the most uniform color you should kettle dye them in a big pot so you can stir them around frequently. Personally, I'm diggin' the marbled effect.
Obviously there is some trial and error involved.
It's still fun though and I think Peanut will enjoy the playsilks. I haven't tried washing them yet, but I think I'll stick with hand washing if needed.

For further info on the art of Kool-Aid dying:

.
.
.
.
Has anyone tried this? How did it work for you?
.
ETA Found instructions on using cake dyes! I think that's next on my list.